


Constant Spring Force
Definition: Spring force is measured by the spring rate. Spring rate is also known as spring constant and it is measured by the pounds of force it takes your spring to travel one inch of compressed distance.
What is meant by the spring constant of a spring?
The spring constant is the constant amount of force increase per the increase of distance traveled; meaning that the force is proportional to the amount of travel.
When working on a compression spring design, besides worrying about the spring dimensions being right, you must make sure that those spring dimensions give your spring the right amount of force. If your spring is too strong, it might not allow the spring to travel the required distance versus if the spring is too weak, it might travel and compress past the required distance. So once you’ve got the dimensions down, then you look at your working loads to start making adjustments to match your required spring force/constant.
Working loads are your required loads at loaded height. The loaded height is the length of the spring after a certain distance traveled. For example, if you need a spring to compress 0.25” (inches) under a load of 5 lb (pounds) and the free length of such spring is 0.9”, your loaded height is 0.65” and the spring rate is 20 pounds per inch (lb/in). Below are the formulas and calculations of this examples.

To calculate loaded height
Loaded Height = Free Length – Distance Traveled
LH = FL – x
LH = 0.9 – 0.25
LH = 0.65
To calculate required spring force/rate
Rate = Load ÷ Distance Traveled
k = L ÷ x
k = 5 ÷ 0.25
k = 20

Constant Spring Force
Attention! Input results shown will be +/- 10% from middle value. Hint: The closer your min and max inputs are, the more accurate your results will be!
Attention! Input results shown will be +/- 10% from middle value. Hint: The closer your min and max inputs are, the more accurate your results will be!
Attention! Input results shown will be +/- 10% from middle value. Hint: The closer your min and max inputs are, the more accurate your results will be!
Constant Spring force refers to the resistance a spring offers when it’s compressed or stretched. The more you compress or stretch it, the greater the force it exerts in the opposite direction. This relationship is explained by Hooke’s Law:
F = k × x
Where:
-
F is the spring force (in pounds)
-
k is the spring rate (a measure of stiffness)
-
x is the deflection (in inches)
This linear relationship allows you to predict the spring’s force at any point in its travel. If a spring has a spring rate of 3 in/lbs and needs to travel half an inch, it would take a force of 1.5 lbs — making design calculations consistent and reliable. Let’s put it into the formula:
F = 3 in/lbs × 0.5 inches = 1.5 lbs
Hooke’s Law ensures that once you know your spring’s stiffness, you can effectively plan around how it will behave when installed. This predictability is crucial in precision applications — from robotics to automotive components — where consistent mechanical performance is non-negotiable.
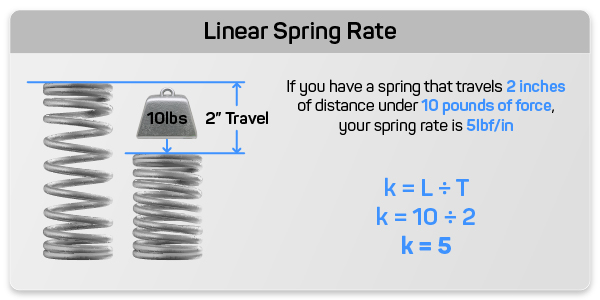
Spring rate, also called the spring constant, defines how much force is needed to compress a spring by one inch. It’s essentially the stiffness of the spring. The formula is straightforward:
k = Load ÷ Distance Traveled
So, for a spring that requires 10 lb to compress 2 inches, the spring rate would be:
k = 10 ÷ 2 = 5 lb/in
A higher spring rate means the spring is stiffer and will require more force to compress each inch. Conversely, a lower spring rate means the spring is softer and easier to compress. Selecting the right spring rate is vital to the functionality of your design. If the spring is too stiff, it may not compress enough to perform its task. If it’s too soft, it might compress too much and compromise performance.
Consider two very different examples: a mechanical keyboard key and a vehicle suspension. One requires a very low spring rate for tactile feedback and comfort, while the other needs a high spring rate to handle significant loads and maintain stability. Understanding spring rate helps you tailor your design to meet specific force and movement needs.
Deflection is how much a spring compresses or stretches when a load is applied. It’s the difference between the spring’s free length and its loaded height. Understanding deflection, or distance traveled, is key to predicting how a spring behaves under load.
You can calculate it using:
x = F ÷ k
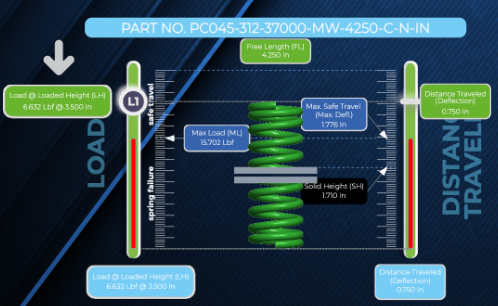
For example, if your spring has a rate of 8.843 lb/in, and you apply 6.632 lb of force, the spring will compress:
x = 6.632 lb ÷ 8.843 lb/in = 0.749 inches

Knowing how much a spring will deflect allows you to confirm whether it can deliver the desired performance within your mechanical system. But be cautious — if you compress a spring beyond its maximum deflection, you risk damaging it permanently or causing coil bind. Coil bind happens when the coils touch completely, preventing any further compression and potentially leading to system failure.
By staying within the safe deflection range, you protect the integrity and lifespan of your spring — which is especially important for high-cycle applications or mission-critical components.
What’s the difference between free length and loaded height?
Free length is the spring’s natural, uncompressed length — how long it is when no force is being applied. Loaded height refers to the length of the spring when it is compressed under a specific load. This is important for ensuring the spring fits properly within the assembly where it’s being used.
To calculate loaded height:
Loaded Height = Free Length - Deflection
Let’s say your spring has a free length of 0.9 inches, and it compresses 0.25 inches when a load is applied. The loaded height would be:
Loaded Height = 0.9 inches - 0.25 inches = 0.65 inches
This value ensures your spring won’t be too tall for the application or bottom out prematurely. This becomes especially relevant in compact devices or assemblies with tight tolerances, where every fraction of an inch counts. Getting this right can make the difference between a smooth-functioning mechanism and one that binds or fails.
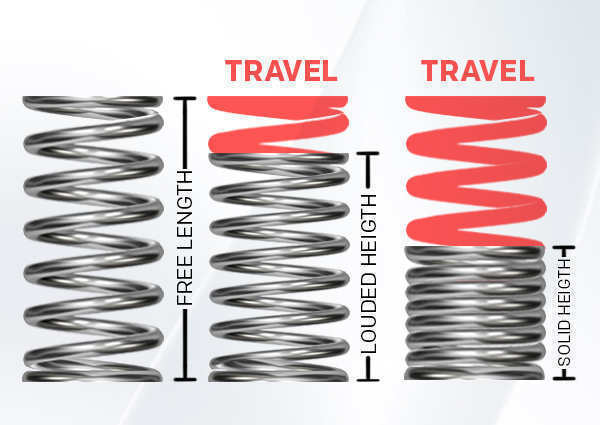
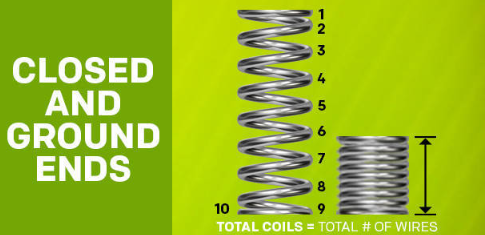
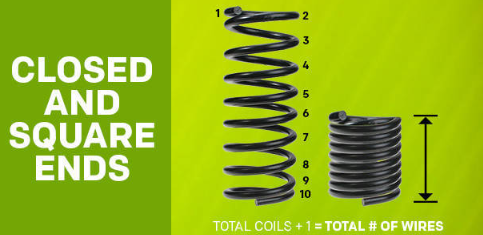
Solid height is the shortest possible length a compression spring can reach when fully compressed — in other words, when all of its coils are touching each other. At this point, the spring cannot compress any further without risking damage. Solid height is determined by multiplying the wire diameter by the total number of coils:
Solid Height = (Total Coils) × Wire Diameter
For example, if a spring has 10 coils and has a wire of is 0.05 inches, its solid height would be:
Solid Height = 10 coils × 0.05 inches = 0.5 inches
Understanding solid height is critical when designing or selecting a spring because it defines the physical limit of how far the spring can safely travel. Compressing a spring beyond this point can lead to coil bind, which causes a sudden loss of flexibility and can permanently deform or break the spring. Good design practice includes adding a safety margin — typically 10–15% — to ensure the spring never reaches its solid height during operation. Tools like Spring Creator 5.0 and the Online Spring Force Tester visually display this limit, making it easier to plan around safe compression zones.
The Online Spring Force Tester is a digital tool that lets you simulate spring performance before placing an order or committing to a design. It’s especially useful for visual learners or those who want to double-check their calculations with a dynamic, animated model.
-
Visual simulation — Watch how the spring behaves as it’s compressed, stretched or twisted. The animation gives a clear picture of how force builds with deflection.
-
Custom inputs — You can enter a specific load or deflection to see what the resulting force or spring height will be, giving you a practical way to test your design assumptions.
-
Built-in safety alerts — If your input values exceed the spring’s maximum deflection or load, the tool will flag it. This prevents costly mistakes or safety issues.
-
Design validation — It’s a quick way to make sure the spring you’re considering will function correctly in your application. The tool removes the guesswork and gives you confidence before moving forward.

The Online Spring Force Tester complements Spring Creator and the Acxess catalog by helping you confirm performance without needing to build a prototype first — saving time and resources.
Before wrapping up, let’s highlight the core principles and tools we’ve covered. These takeaways are designed to help you retain the most important concepts and apply them in real-world projects. Whether you're troubleshooting a mechanical system, designing a prototype, or selecting a spring from a catalog, these insights will keep you on track and improve your design outcomes.
-
Hooke’s Law simplifies spring design — Knowing the relationship between force, deflection, and stiffness allows you to predict and control spring behavior with precision.
-
Spring rate determines performance — Understanding and selecting the right spring rate ensures your application performs reliably and efficiently.
-
Loaded height is critical for fit — Always confirm the spring will physically fit within its housing at full load to avoid design issues.
-
Take advantage of online tools — Spring Creator 5.0 and the Online Spring Force Tester empower you to design and verify springs quickly and with confidence.
-
Stay within operating limits — Respecting a spring’s maximum load and deflection keeps your design safe and extends the life of your components.
Whether you’re sourcing a standard spring or designing a custom one, you now have a solid foundation to make informed engineering decisions. Start exploring these tools and techniques, and bring your spring design ideas to life with clarity and confidence.