


Compression Spring Measurements - How to Measure A Compression Spring

When measuring your compression spring, you must know on the following dimensions:
- Outer Diameter
- Inner Diameter
- Free Length
- Wire Diameter
- Total Coils
Please see the graphic on the right for help.
You may calculate your inner diameter by subtracting two wire diameters from your outer diameter as shown in this formula:
OD - 2WD = IDHow to Measure Your Spring

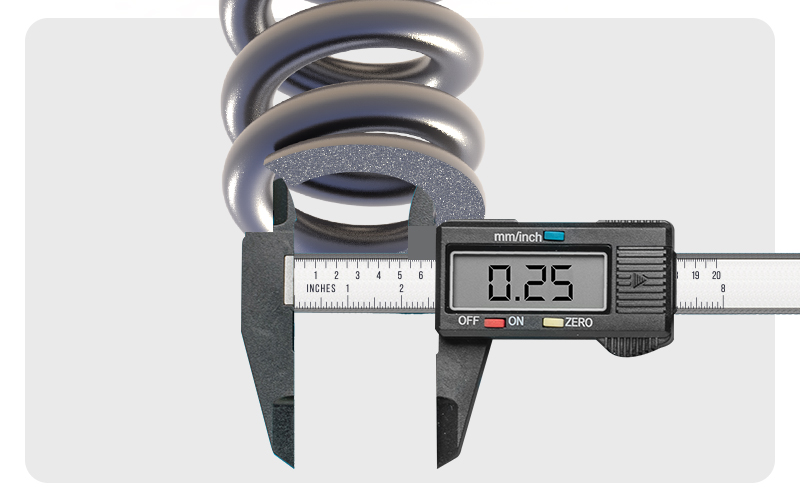
Springs are accurately measured with a dial caliper. The reason for this is because a caliper provides you with a more exact measurement. Wondering why this is so important? Well, take your spring's wire diameter as an example. In most cases, if the spring's wire diameter is off by 0.001" it'll affect your spring's rate and travel so one must have exact measurements when measuring a spring.
Another thing you must focus on is your end types. The end types available are the following:
Feel free to visit our Free Online Compression Spring Calculator
Closed and Square The ends are closed and don't have pitch, therefore, not all the coils on your spring will be active only the coils that have pitch or space in-between the coils are active. In this case you may calculate your active coils by subtracting 2 coils from your spring's total coils: Total Coils - 2 = Active Coils.

Closed and Ground These ends are the same as closed and square ends but the ends go through a grinding process that grinds half a wire diameter off the first and last coils so that your spring will stand vertically. The calculation process for active coils is the same as the one used for closed and square ends. Total Coils - 2 = Active Coils.

Double Closed and Square ends These ends are closed but the first two coils and last two coils are touching. To figure out the active coils when it comes to this type of ends, you'll have to subtract 4 coils from your total coils: Total Coils - 4 = Active Coils.

Open Ends These ends are the opposite of closed and square ends because the ends don't close and don't have pitch. Therefore, all the coils of a spring with open ends are active.

How to Measure a Compression Spring
Table of Contents
Before we dive into the "how," let’s take a moment to discuss the "why." Getting spring measurements right is crucial for a few key reasons:
-
Optimal Performance: When a spring is measured accurately, it delivers the right force, deflection, and lifespan, making sure your assembly works just as it should.
-
Preventing Failure: If the dimensions are off, it can lead to early wear and tear, buckling, or even serious failures of the spring or the parts it interacts with.
-
Cost Efficiency: Avoiding trial and error with multiple spring orders saves both time and money.
-
Informed Decision-Making: Understanding the measurements empowers you to confidently choose from existing stock or communicate precise specifications for custom designs.
- Troubleshooting: Having accurate baseline measurements is essential for diagnosing problems if a spring isn’t performing as expected.
To start, let’s gather the necessary tools. The right instruments can make a big difference in the accuracy of your measurements.
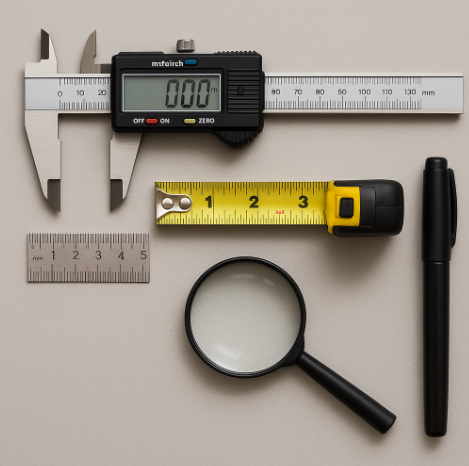
-
Digital Calipers: Your most important tool for measuring wire diameter, outside diameter, and inside diameter. Look for calipers with a resolution of at least 0.001 inches.
-
Ruler or Tape Measure: For measuring free length, especially for longer springs.
-
Flat, Level Surface: For accurate measurement of free length, ensuring the spring stands upright without leaning.
-
Magnifying Glass (Optional, but recommended): Helpful for precise reading of coil counts and inspecting wire ends.
-
Marker (Optional): For marking your starting point when counting coils.
-
Spring Creator 5.0 (Optional): For instant calculations, like spring rate, and simulate the spring’s performance.
Let’s now dive into the essential steps of how to measure a spring, specifically a compression spring. These measurements are the foundation for choosing or designing the right part.

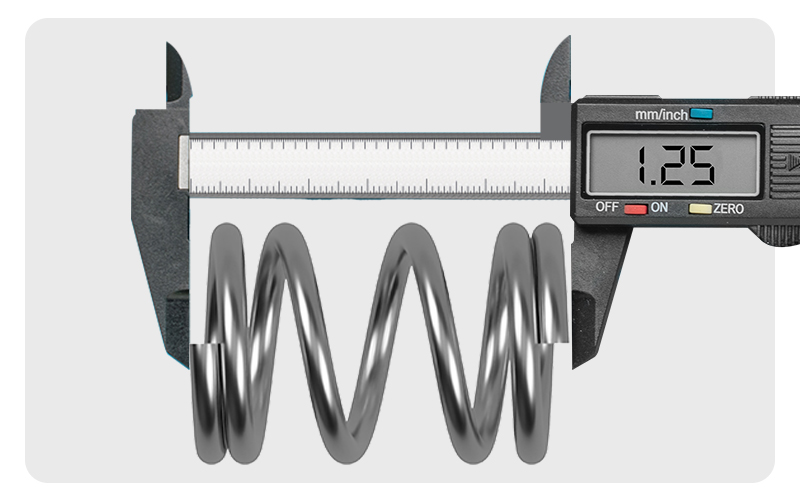
1. Measure the Outer Diameter (OD)
Definition: The full width of the coil from one outer edge to the opposite outer edge.
How to measure: Use your calipers and place them across the widest point of the spring, being careful not to squeeze or distort it. Make sure the jaws are perpendicular to the axis of the spring.
Why it matters: The outer diameter affects how the spring fits into housings or sleeves.
Example: A spring might have an OD of 0.500 inches.
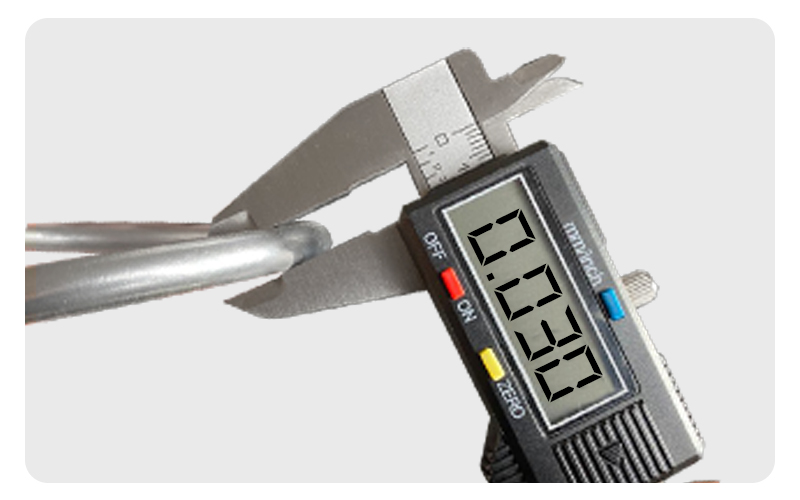
2. Measure the Wire Diameter (WD)
Definition: The thickness of the wire that the spring is made from.
How to measure: Use your calipers to measure the cross-section of the wire in several places. Springs can wear down, especially near the ends.
Why it matters: The wire diameter affects the spring’s stiffness (spring rate), solid height, and strength.
Example: A common value might be 0.040 inches.
3. Measure the Free Length (FL)
Definition: The total length of the spring from top to bottom when it’s not compressed or under any load.
How to measure: Place the spring upright on a flat surface and measure from the base to the top using calipers or a ruler. Avoid leaning or tilting the spring.
Why it matters: The free length determines how much space the spring occupies at rest and influences travel distance and compression limits.
???? Example: You may measure a spring at 2 inches free length.
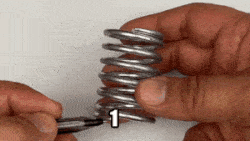
4. Count the Total Number of Coils (TC)
Definition: The number of complete wire turns in the spring from one end to the other.
How to count: Lay the spring flat and count the full loops. Include partial coils (e.g., half a turn = 0.5). Count all coils, including inactive or closed ones.
Why it matters: Total coils influence solid height, travel distance, and overall spring performance.
Example: A spring may have 10 total coils, with 2 inactive ends.
5. Calculate or Measure the Inner Diameter (ID)
Definition: The width inside the coil, from one inner edge to the other.
How to get it: You can either:
-
Measure directly with inside jaws of calipers, or
-
Use the formula:
ID = OD − 2×Wire Diameter
Why it matters: The ID determines whether the spring fits around a rod or shaft.
Example:
0.500 − (2 × 0.040) = 0.420 inches

6. Determine the Solid Height (SH)
Definition: The height of the spring when fully compressed and all coils are touching.
How to calculate: Solid Height = Wire Diameter × Total Coils
Why it matters: If your application compresses the spring too far, it may “bottom out” at solid height, which can cause damage or fatigue. It’s important to note that not every spring can achieve Solid Height.
???? Example:
0.040 × 10 = 0.4 inches

7. Identify the End Type
Definition: The shape and condition of the last coil at each end of the spring.
Common types:
-
Closed and squared: End coils are closed (touching) and aligned to sit flat but not ground smooth
-
Closed and ground: End coils are closed and then ground flat for improved stability and load distribution.
-
Double Closed: Both end coils are tightly wound with no pitch.
-
Open ends: The coil ends are left open with pitch.
Why it matters: End types affect how the spring sits, how force is transferred, and overall stability.
Take a close look or snap a photo for reference when ordering.

Suppose you need to replace a compression spring used in a light assembly. After measuring, you find your spring has these dimensions:
- OD: 0.500 in
-
WD: 0.040 in
-
FL: 2 in
-
TC: 10 coils
- End type: Closed and squared
With those values, you can:
-
Search the Acxess stock catalog
-
Use Spring Creator 5.0 to simulate the spring’s performance
-
Calculate solid height (0.620 in) to confirm max compression limits
Let’s use Spring Finder 5.0 to find a replacement by adding the dimension in the finder:

We can use the filters to narrow down our search, using the equals to find the exact dimension:
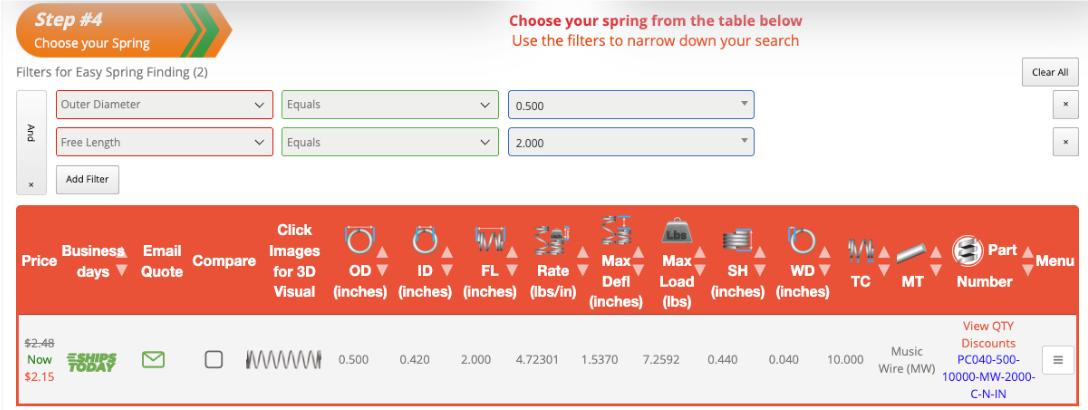
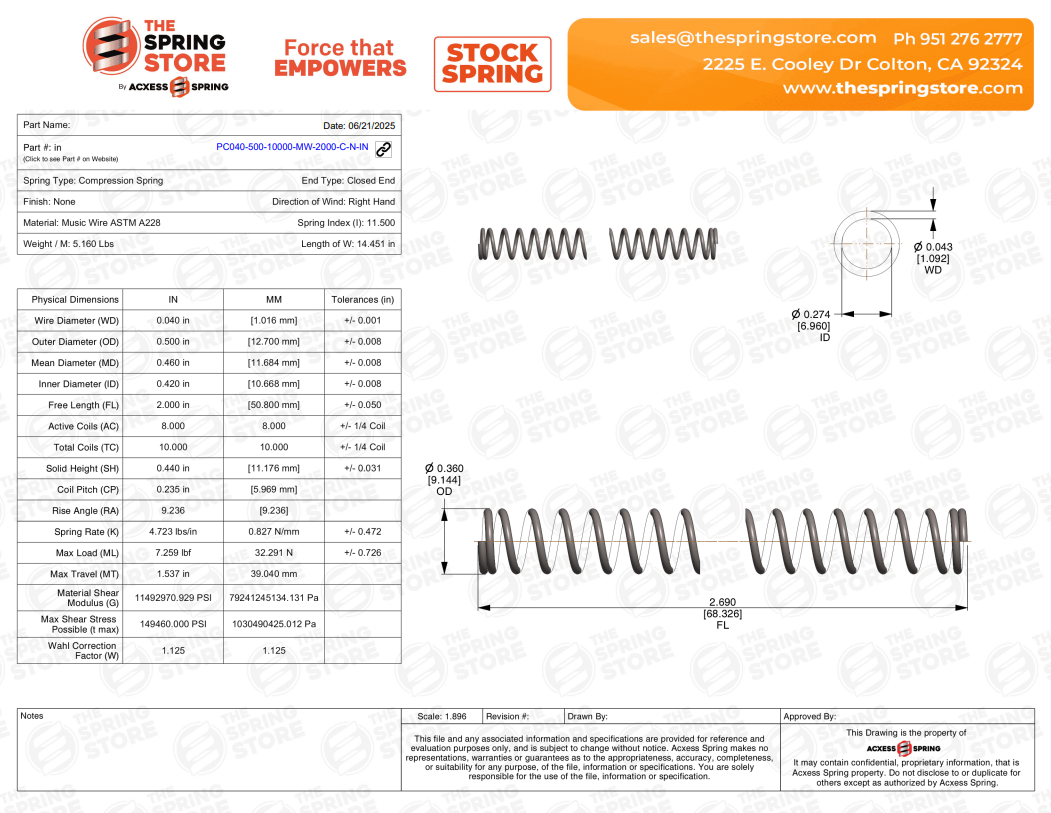
After this quick search we found our replacement on Acxess Spring’s Part Number PC040-500-10000-MW-2000-C-N-IN. This example illustrates how to measure a spring effectively to find the right replacement or custom design.

- Use digital calipers — Precision matters, especially for wire and coil diameters.
- Avoid compressed measurements — Springs should be fully unloaded when measured.
- Take multiple readings — Especially with used or damaged springs.
- Record everything — Even end types, as they influence seating and load behavior.
- Use online tools — The Online Spring Force Tester and Spring Creator make it easier to visualize and validate performance specs.
This new skill will give you the power to make smart choices, whether you’re picking a standard spring from the Acxess Spring catalog or carefully designing a custom solution with Spring Creator 5.0. Remember, every successful mechanism depends on precise components, and getting the hang of spring measurement is a key step toward achieving that level of precision..
Here are 5 key takeaways from this guide:
-
Precision Pays Off: Accurate measurements are non-negotiable for optimal spring performance, preventing failure, and saving costs.
-
Calipers are Your Best Friend: Digital calipers are the most crucial tool for precise wire diameter, OD, and ID measurements.
-
Measure Everything (and Twice!): Don't skip any dimension: Wire Diameter, OD, ID, Free Length, Total Coils, and Active Coils are all vital. Take multiple readings and average them.
-
End Types Matter: The spring's end configuration directly impacts the number of active coils, which is crucial for calculating spring rate and deflection.
-
Tools Like Spring Creator 5.0 Amplify Your Efforts: With accurate measurements, powerful design tools become incredibly effective, allowing you to design and verify springs with confidence.
Need help selecting the perfect spring?
Visit The Spring Store or try Spring Creator 5.0 to start designing your ideal compression spring today.